Getting Started with Turtlebot3 Navigation Simulation using Docker 🐢🐳
This article simply captures the steps I took to run a simulated Turtlebot3 ROS2 navigation stack within an isolated Docker image.
Why Read This?
If you simply want to get started with Turtlebot3 Navigation Simulation where you have a virtual turtlebot3 burger, running in turtlebot3_world with its ROS 2 navigational stack running and allowing for autonomous navigation using Nav2Goal requests sent through an RViz window, then this is the article for you.
If this wall of text had you confused, just look at the .gif below:
Steps
1. Download the latest docker image containing the RMF demos:
docker pull ghcr.io/open-rmf/rmf/rmf_demos:latest
To be changed.
2. Rename the docker image to rmf:latest:
docker tag ghcr.io/open-rmf/rmf/rmf_demos:latest rmf:latest
3. Enable Graphic User Interface access for docker:
xhost +local:docker
Note that this command runs a security risk and should not be used as an official deployment. For the context of research and learning, this command should be okay.
4. Create a docker container from the docker image downloaded:
If Nvidia GPU is present:
docker run -it --rm \
 --name ros2_turtlebot3_gazebo \
 --runtime=nvidia \
 -e DISPLAY=$DISPLAY \
 -v /tmp/.X11-unix:/tmp/.X11-unix \
 --net=host \
 --ipc host \
 rmf:latest /bin/bash
If no GPU:
docker run -it --rm \
 --name ros2_turtlebot3_gazebo \
 -e DISPLAY=$DISPLAY \
 -v /tmp/.X11-unix:/tmp/.X11-unix \
 --net=host \
 --ipc host \
 rmf:latest /bin/bash
5. Set up a ROS 2 workspace:
cd /
mkdir -p turtlebot3_ws/src && cd turtlebot3_ws/src
git clone -b humble-devel https://github.com/ROBOTIS-GIT/turtlebot3_simulations.git --single-branch --depth 1
git clone -b humble-devel https://github.com/ROBOTIS-GIT/turtlebot3.git --single-branch --depth 1
sudo apt-get update && apt-get install ros-humble-nav2-map-server -y
cd /turtlebot3_ws
source /ros_entrypoint.sh
rosdep update && rosdep install --from-paths src --ignore-src --rosdistro=humble -y
6. Build the ROS 2 workspace:
colcon build --symlink-install
7. Set up Gazebo models:
mkdir -p .gazebo/models
cd /turtlebot3_ws/.gazebo
git clone https://github.com/osrf/gazebo_models.git models --depth 1 --single-branch --branch master
8. Launch the Gazebo Simulation:
cd /turtlebot3_ws
export GAZEBO_MODEL_PATH=/turtlebot3_ws/.gazebo/models:
source /usr/share/gazebo/setup.bash
source /turtlebot3_ws/install/setup.bash
export TURTLEBOT3_MODEL=burger
ros2 launch turtlebot3_gazebo turtlebot3_world.launch.py

8. Launch the SLAM Simulation to start generate the map in a new terminal:
docker exec -it ros2_turtlebot3_gazebo bash
source /turtlebot3_ws/install/setup.bash
export TURTLEBOT3_MODEL=burger
ros2 launch turtlebot3_cartographer cartographer.launch.py use_sim_time:=True

9. Run turtlebot3_teleop to start moving the virtual turtlebot3 around on the map to populate the map in a new terminal:
docker exec -it ros2_turtlebot3_gazebo bash
source /turtlebot3_ws/install/setup.bash
export TURTLEBOT3_MODEL=burger
ros2 run turtlebot3_teleop teleop_keyboard
10. Save the map by running the commands in a new terminal:
docker exec -it ros2_turtlebot3_gazebo bash
source /ros_entrypoint.sh
ros2 run nav2_map_server map_saver_cli -f /turtlebot3_ws/map
This should generate map.pgm and map.yaml in
/turtlebot3_wsfile directory.
Additionally, at this stage, please close the
turtlebot3_teleopand SLAM simulation terminals.
11. Launch the Navigation Simulation to start allowing the robot to navigate autonomously in a new terminal:
docker exec -it ros2_turtlebot3_gazebo bash
source /turtlebot3_ws/install/setup.bash
export TURTLEBOT3_MODEL=burger
ros2 launch turtlebot3_navigation2 navigation2.launch.py use_sim_time:=True map:=/turtlebot3_ws/map.yaml
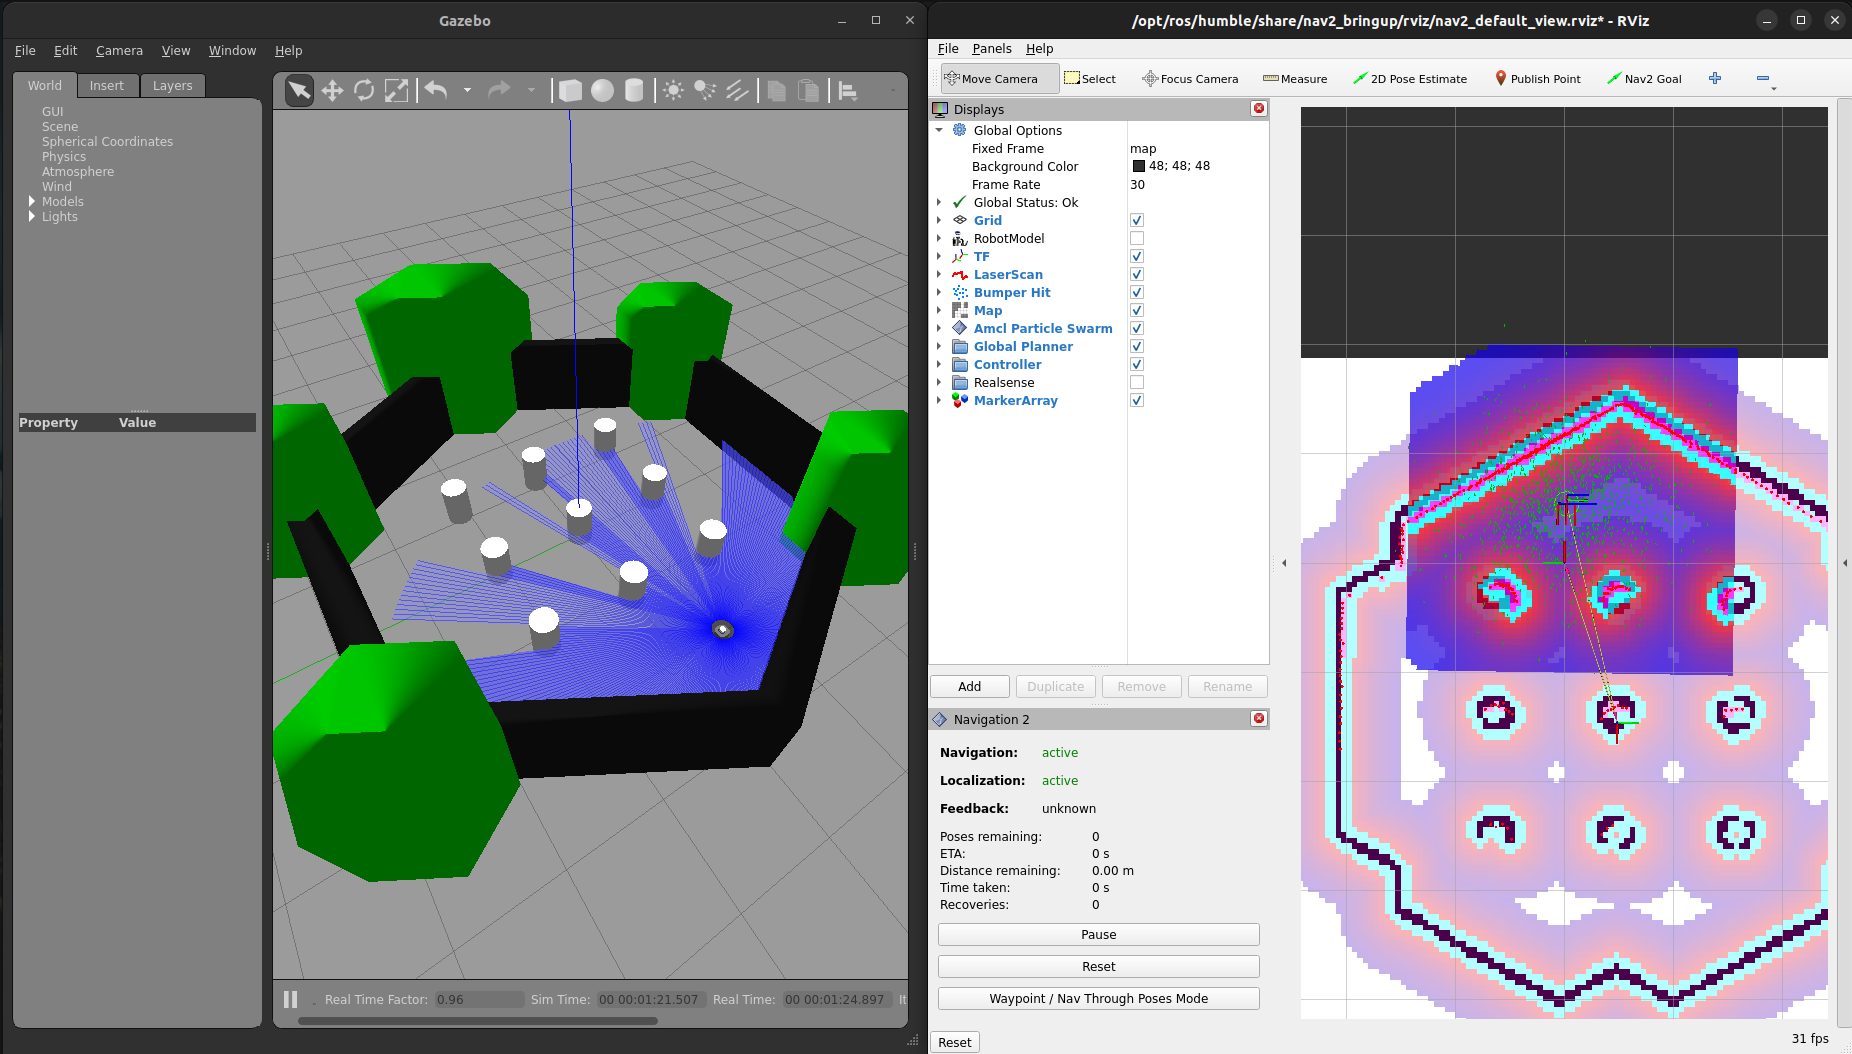
Verify ✅
After completing all aformentioned steps, you should see something similar on your screen like what is shown below:
When sending a Nav2 Goal request via RViz, you should see the following:
The virtual turtlebot3 should then start navigating to the new destination in Gazebo: